Here is a great, easy tutorial on how to get that chalkboard look that is so popular right now in the crafting world.


Supplies:

Black Cardstock

Stamp of your choice

White Ink Pad

Embossing Ink Pad

White Embossing Powder

Heating Gun

Perfect Crafting Pouch


Directions:

1. To start cut a piece of black cardstock to the size you desire.


2. Using the Perfect Crafting Pouch, rub the entire piece of cardstock with it so you won't get any stray embossing powder on your project.

3. Using the stamp and the embossing ink, ink the image onto the black cardstock.


4. Pour the white embossing powder on the image. Tap to get excess powder off.

5. Heat with a heat gun to set powder in.

6. Stamp the image in the white ink and then stamp the image again on your paper, slightly next to the embossed image (you want it to appear a little fuzzy)


7. To ink the edges use the white ink pad. This will give it that used, chalkboard type look to it!


Hello! This is an altered notebook. I bought this little book on clearance and wanted to use it for my projects but still have it small enough to throw in my purse when shopping. Because of the shiny front, getting paper and small stickers to stick to it would be hard, however it was very easy with The Best Glue Ever ! All the little papers were super easy to stick and I only needed a small amount of glue. Now I can easily see what projects I need to do and what I need to buy to complete all my projects.


This card was something I wanted to be fun, cute and easy to make as I needed to make around 12 of them to send out. The house that I diecut had many small pieces and those are hard to work with, however I had no trouble at all using The Best Glue Ever. It required just a little bit of glue and I was easily able to put all the pieces together and layer everything perfectly. When you need to produce alot of cards for a new home, a holiday or a party using this glue really makes the job easier.


Each year I look forward to Black Friday and this year is no different. It's only september but I'm ready! Since I'm finally on the mend from my surgery I couldn't wait to play with paper again.

This was made with regular envelopes, chipboard and scrapbook supplies. Now just gotta wait for all the good coupons to come out to fill it with for that fun day that I spend with my BFF each year!


The silhouette cameo is an amazing thing. I really can't express how much I love this machine. It helps my scrapbooking. It's helped decorate my home. Now it's helping me to vamp up my wardrobe.

I saw this shirt online. Loved the saying but couldn't figure out where to buy the shirt as it was pinned from a pin from a pin. Get it? That happens alot on Pinterest!

So I made my own. Using freezer paper I cut out a stencil and then mixed together some paint. I used black acrylic paint and fabric medium (which makes ANY paint into fabric paint). It dried overnight and this is what it looks like. I still need to wash/iron it but so far I'm loving it!

I love to use scrapbook items for "non scrapbook" related purposes. Kind of gives an extra creative feel to it. I wanted a new coupon binder that was smaller and I could easily carry, but it had to still fit all the coupons I keep on me. The bo bunny binder was perfect! I decorated the front, used my cameo to cut out dividers/tabs and filled it with bo bunny's divided page protectors. It came out perfect for this extreme couponer!


All the papers I used are ones I had, I learned to coupon from my mom so I wanted it to have a "50's" feel to it and used papers accordingly.

Don't we all love a good deal? I know I sure do! Michaels has some items that were discontinued so they SHOULD have been pulled off the shelves. However if you find them, they ring up a .01 and it's a corporate rule that the store must sell them to you. Here are photo's of what I found, total of 384 items. Hope this helps someone find some if your on the hunt for penny items!


My 11 year old wanted to help me with this, he was the assigned "glue-er" and we had fun working on it together. Have you ever tried to share a crafting space with an 11 year old? We had to get creative, that's for sure!

The colors are to match his new room when we move this fall! It was a great project to do together, we got to be creative and talked alot about when he was born.


Hello! My project for today is to take an ordinary mason jar and turn it into something fun for our kids to drink out of. I couldn't find exactly what we wanted so we combined a few things together!

Supplies:
Mason Jar with handle (these are .98 at walmart with no lid)
Mason Jar lid and topper (I just bought a mason jar at dollar tree and used the lid)
Vinyl or a Stencil
Crop-a-dile or drill
Rubber Grommet (home depot has these)


The first step is to gather all your supplies. I used vinyl scraps I had on hand and asked my boys to pick a design that I could cut out on my silhouette cameo. Wash the jars out well and let them dry. Then your all set to start!


To make the straw hole in the lid you can use 1 of 2 things! If your handy or can get someone to help you, you can use a drill and easily drill a hole in the top. I prefer my holes to be near the edge so it's easiest to drink out of. Since I didn't have a drill to use I used my cropadile. I easily cut holes in the lid with it until I had a big hole. The size hole you need can vary, depending on the size grommet you buy. I used 5/8" ones.


When your done punching the hole, insert the grommet so that it nicely fits inside. This is what the topper of the lid will look like once your done. I always clean mine up with a little goo gone to get the residue off from the price sticker, but this is optional!


Now you can decorate as you please! I used my Silhouette Cameo to cut the vinyl out in a boogie board for my oldest son. You can also use a stencil, glass paint, etching cream or handcut vinyl. Then you just put your lid on, insert a straw and your cup is complete!


This project was fun to make! It combined my two favorite things - crafting and organizing. I've thought about making one for awhile and now I think it will really help us make the day easier!

First I gathered all my supplies. My binder, a bunch of folders, colored pens and dividers. I opted for dividers with pockets so I could hold all the papers that come into the house. Hopefully this will take them ALL of my fridge!


Then looking online, I found some printables that would be useful. Any I couldn't find, I made myself in word.

This one is a room designer. We are buying a home in the fall so we'll be designing and decorating new rooms once we move in.


Next I have the dates to remember. This is where I'll record everyone's birthdays and anniversaries so I don't forget any. I can easily glance at a month and know what I need to send out.


In our section, Finance, I have a spot for bills. This records the bills information - name, address, account number, phone number and website.

Here is one spreadsheet I made. Each month will have one of these for all the bills we paid. It's a great way to keep track of duedates, receipts and any notes about the bill.

Once you have everything you need printed, then you just assemble it! I have a few sections so far in mine - home, finance, school, fun and medical.


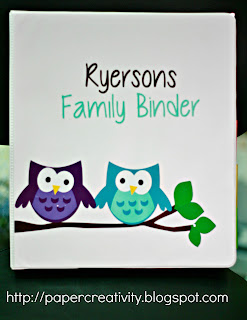
This is the part I love. The front of my binder was plain white so it was screaming for some decoration. I cut these owls out of vinyl so they would stay on. You can use anything you'd like to use to make it reflect your own style.


Linking up to these:


Keep In Touch

Pinterest Facebook Google+

Contact Me

Subscribe via Email

Enter your email address:


Subscribe Now: Feed Icon

Grab My Button

Powered by Blogger.

Search My Blog

Design Teams I Belong To:

None at the moment, please see my resume for past Design Team Experience.

Followers

Sponsors

 photo adspace_zpsf8c29f7b.jpg

Crafty Visitors